How to draw straight lines and clean shapes on a PDF
Draw straight lines and clean shapes on a PDF with Snap Shapes, a movable ruler, or precise shape placement on iPhone, iPad, and Mac.
Direct answer
How do you draw straight lines and clean shapes on a PDF?
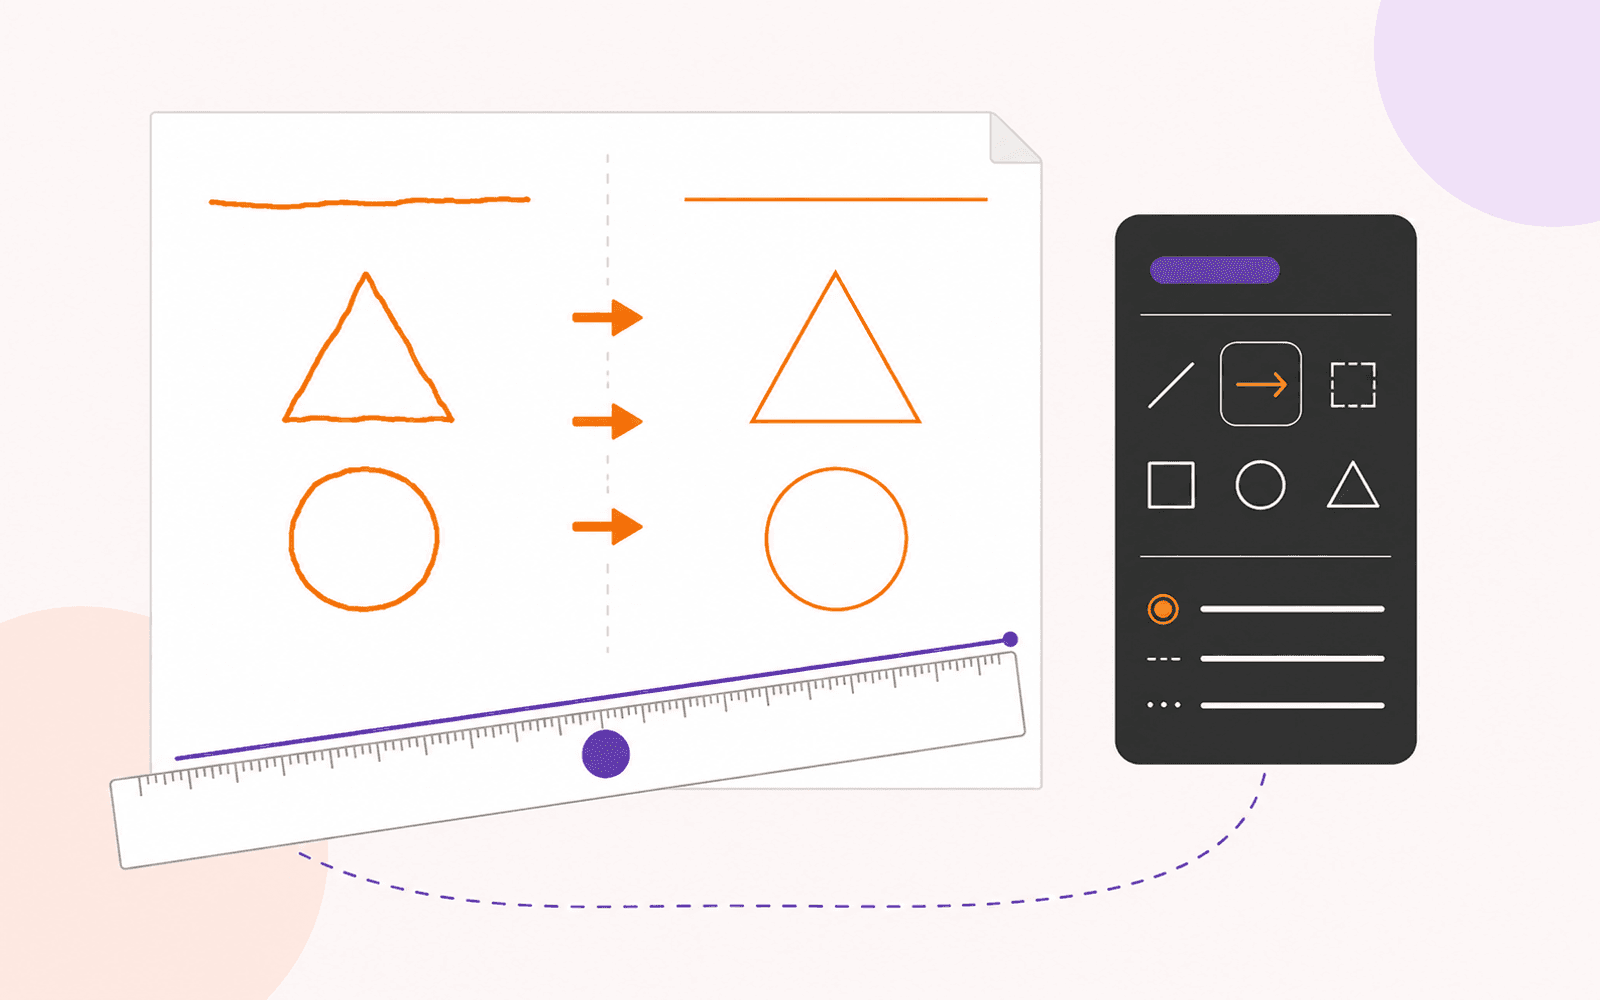
In PDF Max 27.2, choose Home > Draw, then use the contextual Annotation tab. Leave Snap Shapes on, draw a line or shape in one stroke, and pause before lifting to replace the rough stroke with a clean version. Use Ruler when a stroke must follow an exact edge or angle, or switch the Shape control to Drag to place when you want to insert a precise shape directly. The finished marks remain editable PDF annotations; the ruler itself is only an on-screen guide.
A freehand line can be good enough for circling a phrase, but it is distracting in a table, diagram, graph, form, or geometry problem. The usual repair—undo, draw again, undo again—does not make your hand steadier. It only makes the annotation slower.
PDF Max 27.2 provides three deliberate ways to get a clean result. Snap Shapes recognizes a stroke after you pause at its endpoint. Ruler constrains ink to a movable straight edge. Drag to place inserts a precise shape without asking the app to interpret your drawing. All three work on the PDF annotation layer, but they solve different problems.
Pick the right method before you draw
| What you need | Use | Best for |
|---|---|---|
| A quick clean version of a shape you can already sketch | Snap Shapes | circles, rectangles, arrows, diagrams, and rough geometric notes |
| A straight stroke at a chosen angle or measured length | Ruler | graph axes, underlines, separators, construction lines, and forms |
| A shape with exact geometry from the beginning | Drag to place | callouts, boxes, repeated symbols, and formal diagrams |
Snap Shapes preserves the speed of handwriting. The Ruler preserves the feel and appearance of the active pen while controlling its path. Drag to place behaves more like a conventional shape tool. Choosing between them is more reliable than trying to make one mode handle every mark.
Turn a rough stroke into a clean shape
Start on a duplicate when the original PDF is important or shared. Then:
- Open the PDF in PDF Max 27.2 or later.
- Choose Home, then Draw. You can also begin with Annotate > Draw.
- PDF Max opens the contextual Annotation tab beside the active ink tools.
- Open Shape and make sure Snap Shapes is on.
- Leave the shape choice on Automatic for general drawing, or choose a specific kind when recognition should be constrained.
- Draw the line or shape in one continuous stroke.
- Stop at the endpoint without lifting your finger, stylus, or pointer.
- When the rough stroke changes into a clean shape, lift to commit it.
The pause is the important gesture. If you lift as soon as the stroke closes, PDF Max keeps ordinary ink. If you pause while still pressing, the stroke can morph into the recognized geometry. For a line or arrow, you can continue moving the endpoint after the shape appears and lift when the final length and direction are right.
Automatic recognition covers common lines, arrows, rectangles, circles and ellipses, triangles, polygons, arcs, parabolas, and smooth curves. It deliberately rejects many tiny marks, cursive strokes, letters, and irregular blobs rather than forcing every piece of handwriting into geometry.
Constrain recognition when Automatic guesses wrong
Automatic is useful when a diagram contains several kinds of shapes. A constraint is better when you are repeating one kind—for example, drawing several rectangles around answers or several arrows between stages.
With the pen active, open Shape, keep the mode on Snap drawing, and choose the expected shape instead of Automatic. The next held stroke is evaluated only against that geometry. Return to Automatic when you no longer want the restriction.
This does not make an incomplete gesture valid. A rectangle still needs a coherent closed path, and an arrow still needs a shaft and head that can be recognized. The constraint removes competing interpretations; it does not replace the stroke with an unrelated symbol.
The same menu includes Snap to Connections:
- Off leaves every new shape where you draw it.
- Snapped Shapes helps a new snapped stroke meet shapes created by the same workflow.
- All Ink also allows connections to ordinary ink.
Use connection snapping for flowcharts and connected diagrams. Turn it off for nearby but independent marks, such as a line under a label, where a magnetic endpoint would be unhelpful.
Draw an exact straight line with the Ruler
Shape recognition cleans a completed line. The Ruler controls the path while you draw it, which is better when the stroke must follow a known angle or line up with existing content.
- Choose Home > Draw and select the pen style, width, and color you want.
- On the contextual Annotation tab, choose Ruler. It appears beside the ink tools because it constrains drawing rather than adding a document object.
- Drag the ruler body to move it over the page.
- Rotate it with a two-finger gesture on a touch device or the angle control and pointer gestures on Mac.
- Start the stroke close to either edge and draw along it.
- Lift when the line reaches the intended endpoint.
The ink follows the ruler edge while preserving the active pen appearance. This is useful for a purple highlighter divider, a thin black graph axis, or a colored construction line: the guide controls direction without silently replacing your chosen tool.
Open Ruler Options when freehand placement is not precise enough. You can enter an exact angle and on-screen center position, switch the scale between centimeters and inches, show or hide digits, recenter the ruler, or hide it. Quick angle choices run in 15-degree steps, while the options dialog accepts a more exact angle.
The scale responds to the current zoom, so use it as an on-screen drawing guide rather than a promise about how large a printed line will be on every printer. If physical output matters, print one representative page at 100 percent and measure the result.
Know what is saved
The finished stroke is part of the PDF's editable annotation layer. You can select, move, restyle, duplicate, or delete it like other supported ink annotations. The Ruler is different: it is an ephemeral canvas overlay. It does not print, become part of page history, or travel in the PDF when you share it.
That separation is intentional. A recipient gets the straight stroke, not the construction tool that guided it. If a clean mark must become fixed page appearance for a delivery workflow, keep the editable working PDF and prepare a separate flattened copy only after the annotations are final. The guide to checking whether a PDF is flattened explains how to test the copy you will actually send.
Place a precise shape without drawing it
Some diagrams are faster when there is nothing to recognize. Open Shape, switch from Snap drawing to Drag to place, and choose a shape from the library.
For a line, arrow, rectangle, ellipse, or triangle, drag from the starting point to the opposite corner or endpoint. For a polygon, tap each corner and finish with a double-tap, Return, or Done. A polyline uses the same vertex-by-vertex approach but remains open. Curves such as arcs, parabolas, and smooth curves use a single placement stroke.
Use this mode when you need repeated boxes of similar size, a deliberate double arrow, or geometry that should not inherit the small variations of handwriting. Return to Snap drawing when speed and a pen-first gesture matter more.
How this compares with Apple Markup and note apps
The pause-to-shape gesture is familiar across Apple drawing workflows. Apple Support documents drawing a shape in one stroke with a finger or Apple Pencil and pausing until a geometrically clean version replaces it. Notability similarly documents hold-to-straighten and hold-to-detect-shapes preferences.
Goodnotes documents a separate Ruler that can be moved, rotated with two fingers, set to an exact angle or position, and displayed in centimeters or inches. Those shared conventions matter: a user should not have to learn an arbitrary gesture merely because the background is a PDF rather than a notebook page.
PDF Max combines those conventions with PDF-specific behavior: the result remains on the PDF annotation layer, the Shape menu can constrain recognition or switch to placement, and connection snapping can join diagram parts. The comparison is about workflow, not file interchange. Another viewer may render the marks but will not expose PDF Max's exact recognition controls.
Fix the common failure modes
The stroke stays rough. Draw it in one continuous motion and pause at the final point before lifting. Confirm that Shape is set to Snap drawing and Snap Shapes is on.
The wrong shape appears. Undo, choose a specific constraint in the Shape menu, and draw again. For a formal symbol, use Drag to place instead of recognition.
A finger scrolls instead of drawing on iPad. If Apple Pencil or another stylus is available, turn on Draw with Finger when you want both inputs to create marks. Leave it off when the finger should pan and the stylus should draw.
The ruler moves instead of making ink. Start the stroke beside an edge, not on the ruler body or its angle control. Reposition the guide, then draw close enough for the edge constraint to engage.
The ruler is missing after reopening. That is expected. The ruler is an on-screen session guide; the strokes it produced are the document edits.
You need to find a handwritten label later. Shape recognition does not turn ordinary handwriting into typed PDF text. PDF Max has a separate on-device handwriting search workflow for pen annotations.
You want to remove an accidental mark. Select or undo the ink rather than covering it. The guide to removing PDF highlights and annotations explains the difference between deleting an editable annotation and dealing with color baked into a page.
Plan and device requirements
Snap Shapes, Ruler, shape placement, and Draw with Finger are included with PDF Max Free as annotation tools. They require PDF Max 27.2 or later. At publication on September 6, 2026, Apple's US storefront lists both PDF Max and the separate PDF Max Pro app at version 27.2.0.
PDF Max requires iOS 18 or later, iPadOS 18 or later, or macOS 15 or later on an Apple silicon Mac. The drawing, recognition, connection snapping, and ruler interactions do not require Apple Intelligence, a language model, a model download, or an internet connection. Apple Pencil can improve precision on a compatible iPad, but a finger or pointer can use the workflow too. The plan comparison shows how Free annotation differs from Premium PDF editing and transformation features.
Open one disposable page and try the three modes in order: draw a circle and pause, draw a line along the Ruler, then place a rectangle by dragging. Once the distinction is clear, use the fastest mode that preserves the geometry your document actually needs.